If you can’t access the Action Center in Windows 11, below are some troubleshooting tips that might help. So, let’s check them out.
1. Restart Windows Explorer
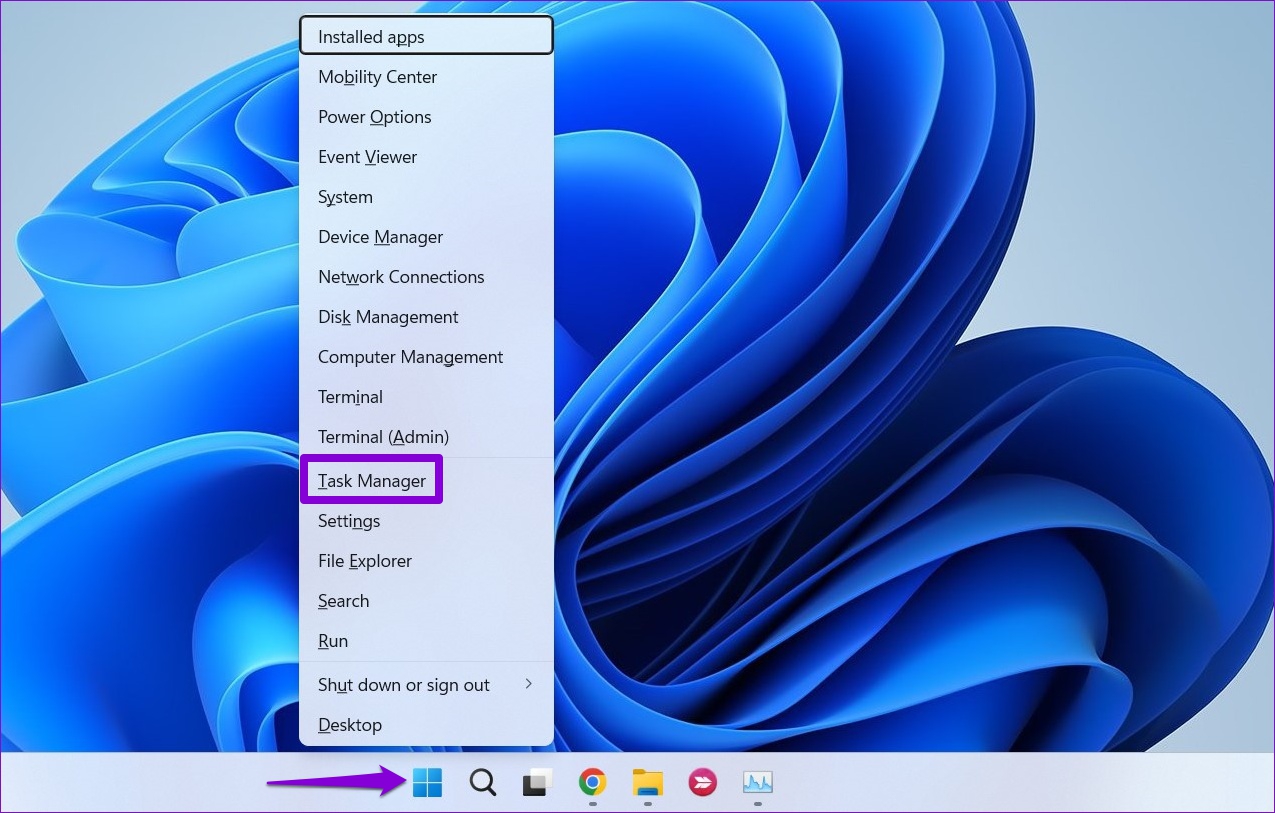
Windows Explorer is a critical process that provides the user interface for the Desktop, Taskbar, Start menu, File Explorer, and Action Center. So, if Action Center is not opening, restarting the Windows Explorer process will help. Step 1: Right-click the Start icon and select Task Manager from the list.
Step 2: In the Processes tab, locate Windows Explorer. Right-click on it and select Restart.
After that, see if you can open Action Center.
2. Run SFC and DISM Scan
Corrupted or missing system files can also break certain Windows features or cause the system to crash. In such cases, running an SFC (or System File Checker) scan can help you repair those system files. Here’s how to run it. Step 1: Right-click on the Start icon and select Terminal (Admin) from the list.
Step 2: In the console, paste the following command and press Enter.
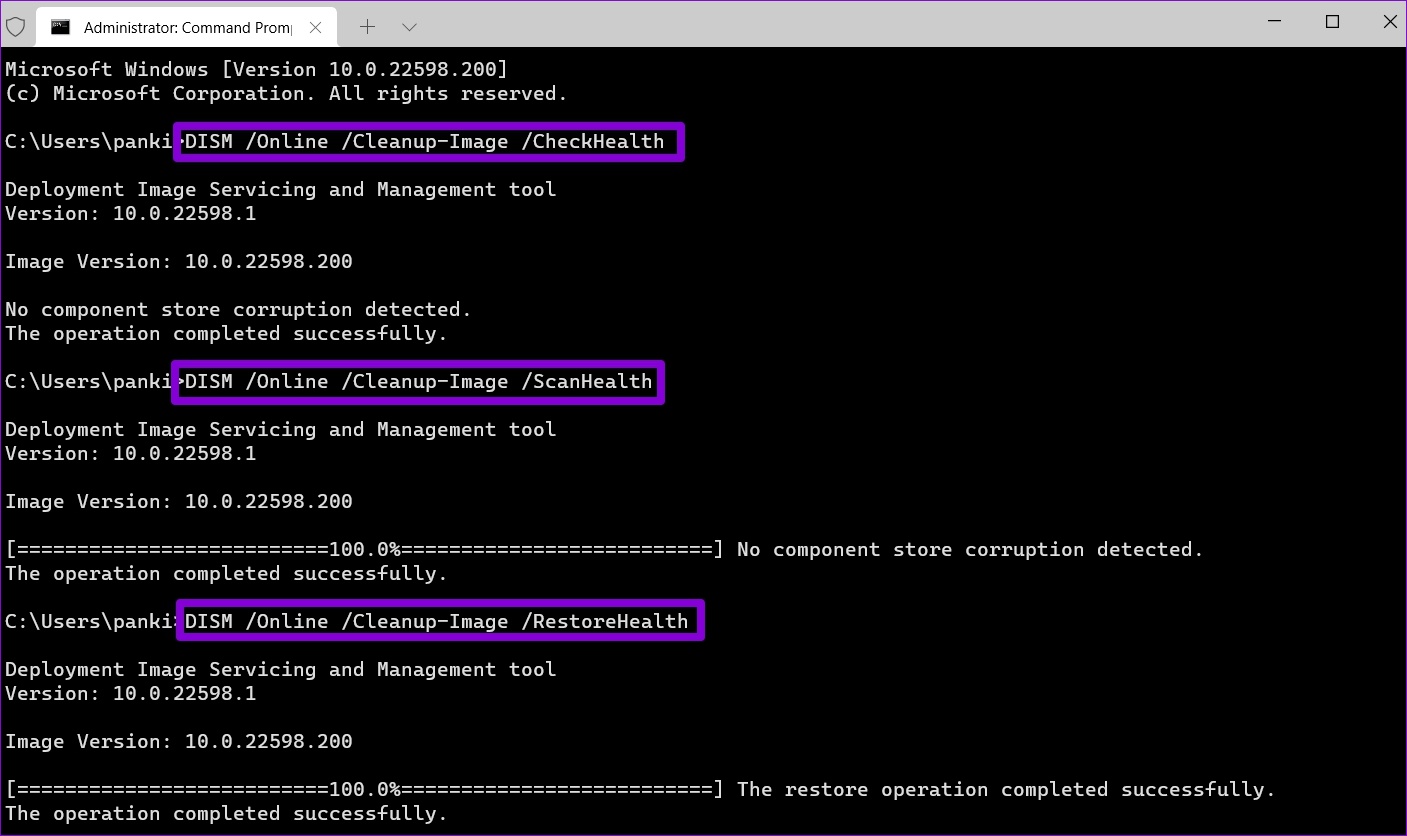
If the tool detects any errors, it will ask your permission to fix them. After that, restart your PC and try to open Action Center again. If the problem persists, you can try performing a DISM (or Deployment Image Servicing and Management) scan. However, you’ll need to have an active internet connection for this to work. Open the Windows Terminal with admin rights and run the following commands.
After the scan completes, restart your PC and check if you can open Action Center.
3. Re-Register Action Center
If the issue remains, you can use PowerShell to re-register Action Center on Windows 11. Here’s how. Step 1: Click on the search icon on the Taskbar, type in windows powershell, and click on Run as Administrator.
Step 2: Paste the following command and press Enter.
After running the above command, restart your PC, and Action Center should start working again.
4. Tweak Registry Files
Registry Editor is a powerful tool that allows you to make system-level changes on Windows. If the Action Center does not open, you can use the following registry trick to fix it. However, before you proceed, make sure you backup all the registry files. Step 1: Press the Windows key + R to open the Run dialog. Type regedit in the Open field and press Enter.
Step 2: In the Registry Editor window, paste the following path in the address bar at the top and press Enter.
Step 3: Inside the Windows key, locate the Explorer key. You’ll need to create a key if you can’t find any existing one. For that, right-click on the Windows key, go to New, and select Key. Name it Explorer.
Step 4: Right-click on the Explorer key, go to New and choose DWORD (32-bit) Value. Name it DisableNotificationCenter.
Step 5: Double click on the newly created DWORD, set its value to 0 (Zero) and hit OK.
Restart your PC and check if this helps to get Action Center working again.
5. Modify Local Group Policy
Another reason why you may fail to access the Action Center is if it’s disabled from the Local Group Policy Editor. In that case, you can follow the steps below to enable it again. It’s important to know that Group Policy Editor is only available on Pro, Enterprise, and Education editions of the Windows. So, if you’re using the Home edition of Windows 11, this method won’t work for you. Step 1: Press the Windows key + R to open the Run utility, type gpedit.msc, and press Enter.
Step 2: In the Local Group Policy Editor window, use the left pane to navigate to the following folder.
Step 3: On your right, locate and double-click the ‘Remove Notifications and Action Center’ policy.
Step 4: Choose the Disabled option and then hit Apply.
After making the above changes, restart your PC, and see if the problem is still there.
6. Perform Disk Cleanup
Old temporary files on your PC can also affect Windows processes and cause anomalies. You can clear those temporary files quickly using the Disk Cleanup utility. Step 1: Click on the search icon on the Taskbar, type in disk cleanup, and press Enter.
Step 2: Use the drop-down menu to select your primary drive and click on OK.
Step 3: Under Files to delete, use the checkboxes to select the temporary files. Then, click on OK.
Step 4: Choose Delete Files when prompted.
7. Perform System Restore
If you still can’t open Action Center at this point, you can perform a system restore to revert to a point when the Action Center was working fine. This will help undo any system changes that may have caused the issue. Also, it won’t remove your personal data and files. Here’s how. Step 1: Open the search menu, type in create a restore point, and press Enter.
Step 2: Under System Protection, click on the System Restore button.
Step 3: Click on Next.
Step 4: Select the restore point when the Action Center was working fine.
Step 5: Review all the details and click on Finish.
Your PC will reboot and revert to the specified restore point. After that, check if the Action Center opens normally.
Back in Action
It’s frustrating when an important utility like Action Center stops responding on Windows. However, most of the time, you should be able to resolve the issue by restarting the Windows Explorer process or re-registering the Action Center. Rarely, you may need to take drastic measures, such as performing a system restore. Let us know which of the above solutions worked for you in the comments below. The above article may contain affiliate links which help support Guiding Tech. However, it does not affect our editorial integrity. The content remains unbiased and authentic.


