However, unlike the free-to-use and readily available stickers on messaging platforms such as WhatsApp, Discord stickers are trickier. First, only server owners or members with specific role permissions can upload custom stickers to a server. The number of uploadable custom stickers depends on the server’s boost level. Also, using custom stickers across different servers is restricted for Discord users without Nitro. With that in mind, here’s how you can import and use Discord stickers:
How to Import Stickers on a Discord Server
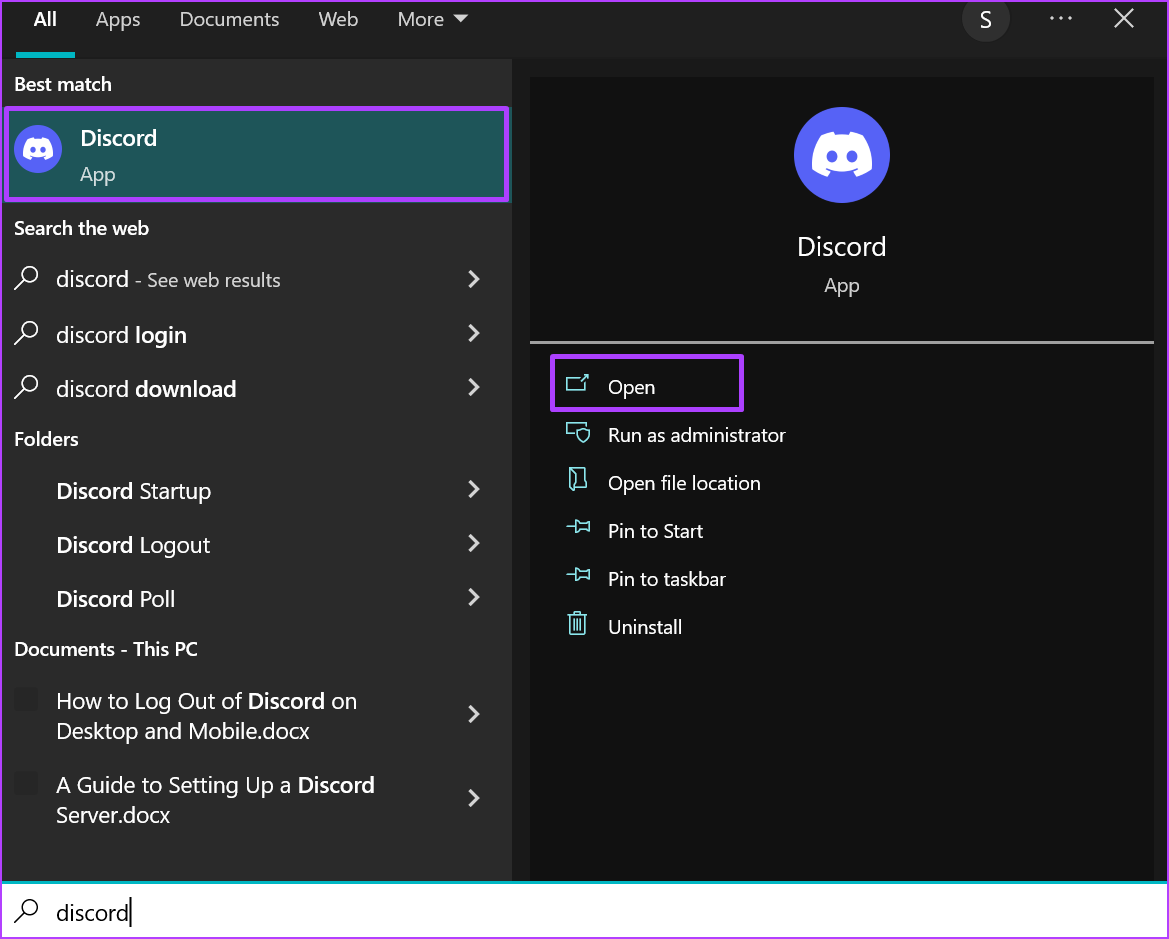
As previously mentioned, importing stickers into a Discord Server requires Server ownership. If you are not a Server owner, you can also request role permission to ‘Manage Emojis and Stickers.’ At the time of writing, the sticker management is possible only from the Discord desktop app and web. After you get the permission, follow the steps below to import stickers into your Discord Server. Step 1: On your PC, click the Start menu and search for Discord.
Step 2: Click on Open to launch the Discord app from the results.
Step 3: On the left of the Discord app, click on your Server to open it.
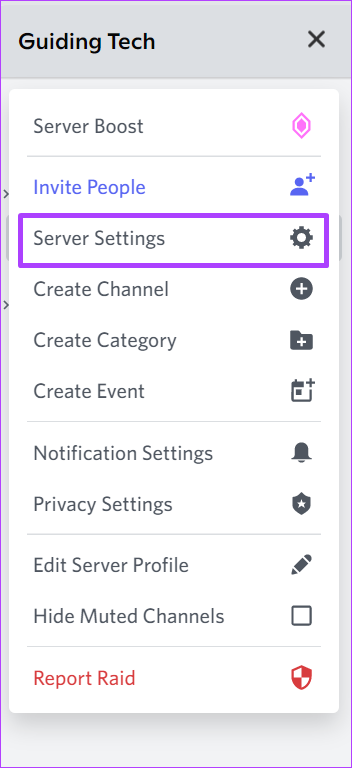
Step 4: At the top of the Discord app, click on the drop-down beside your Server’s name.
Step 5: Click on Server Settings from the options.
Step 6: On the Settings page, click on Stickers.
Step 7: Click on Upload Sticker.
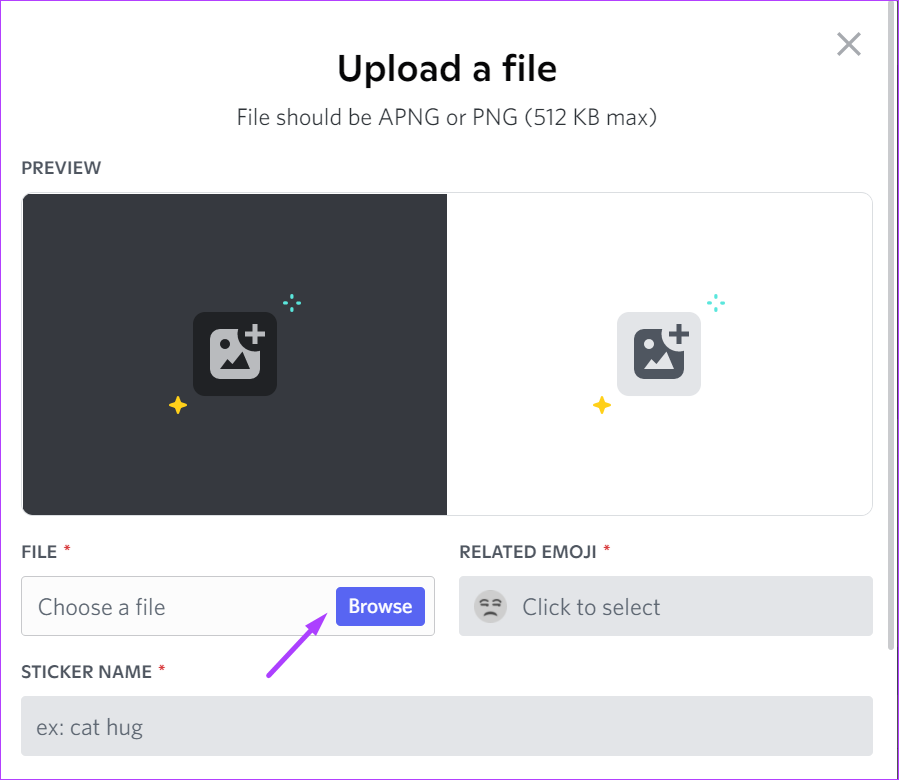
Servers without a level only have five free sticker slots. To upload more stickers, you’ll need to pay to boost the Server level. Step 8: Click on Browse beneath the File field.
Step 9: Select the sticker file from your PC and click Open. Discord accepts stickers in PNG or APNG file formats.
Step 10: Click on the emoji beneath the Related Emoji field.
Step 11: Select the emoji you want you stick connected with.
Step 12: Beneath the Sticker Name field, enter a name for your sticker.
Step 13: Provide a Description for your sticker to help with accessibility.
Step 14: Click Upload to save your new sticker on your Server.
How to Use Stickers on a Discord Channel
For Discord users, you can access the Stickers of your Server from the Text Channels. If you want to use the sticker from one server on another server, ensure you have Nitro. Here’s how you can use stickers: Step 1: On your PC, click the Start menu and search for Discord.
Step 2: Click on Open to launch the Discord app from the results.
Step 3: On the left of the Discord app, click on your Server to open it.
Step 4: Select the drop-down beside Text Channels and select the channel to which you want to send the sticker.
Step 5: On the text channel, click on the Sticker icon at the bottom of the page.
Step 6: Select your Server at the left of the pane to view all your Server stickers.
Step 7: Click your preferred sticker to send it to the channel.
How to Animate Stickers on a Discord Server
There are two sticker formats allowed on Discord; APNG and PNG. APNG represents animated stickers, while PNG represents stickers without animations. If your stickers are APNG, but you notice that they do not animate when you use them, here’s what you can do: Step 1: On your PC, click the Start menu and search for Discord.
Step 2: Click on Open to launch the Discord app from the results.
Step 3: Click on the User Settings (gear icon) in the bottom-right corner.
Step 4: Scroll down to App Settings section and click on Accessibility.
Step 5: Scroll down the Accessibility Settings to Stickers.
Step 6: To ensure your APNG file stickers animate when you use them, choose between Always Animate or Animate on Interaction.
Step 7: Click on the Esc button on the page to return to the Text Channel with your stickers. You can check if your APNG stickers are animated.
Fixing a Failed Discord Update
If you do not have the option to upload or use stickers on your Discord server and channel, it might be because your app isn’t updated. It can also be because your Discord failed to update. You can try re-installing Discord or clearing your cache to fix the problem. The above article may contain affiliate links which help support Guiding Tech. However, it does not affect our editorial integrity. The content remains unbiased and authentic.


