The methods mentioned in this article are divided into two categories: one lets you temporarily disable the keyboard, which is what most people are looking for, and the other lets you permanently disable the keyboard. So, let’s start by temporarily disabling the keyboard on your Windows machine.
How to Temporarily Disable Laptop Keyboard
There are several ways to temporarily turn off your laptop keyboard on a Windows operating system. We have listed the best ways to disable the laptop keyboard temporarily. Let’s begin.
1. Shut off the Keyboard Using the Device Manager on Windows
You can quickly disable the built-in keyboard on your laptop whenever you want. The steps are plain and simple. Follow the steps below. Step 1: Press the Windows key on your keyboard, type Device Manager, and click Open. Tip: Alternatively, you can open the Run command box using the keyboard shortcut ‘Windows key + R,’ type devmgmt.msc in the text box, and press Enter.
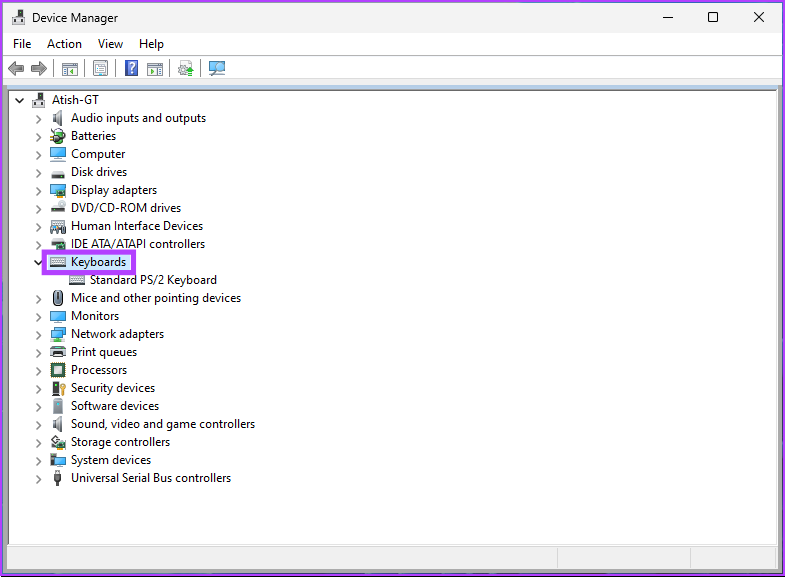
Step 2: In the Device Manager window, select and double-click on Keyboards.
You will see a list of keyboards currently connected to your laptop including the built-in one. Step 3: Find the built-in keyboard, right-click it, and choose Uninstall device from the context menu. Note: Please remember that some laptops may display the Disable device option. Click on it. The result will be the same.
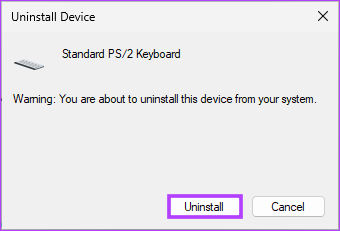
Step 4: In the prompt asking you to confirm the decision, click Uninstall.
That’s it. You have disabled your built-in laptop keyboard on Windows. Mind you, this is not a permanent solution. The setting will remain in place until you restart your machine. Move on to the next method if you want a solution that will last for a while without having to follow a long list of steps.
2. Disable the Keyboard Using the Wrong Driver on Windows
This is an extended version of the above method. However, this method allows you to disable the keyboard for a longer period of time, or at least until you decide to revert. Follow the below-mentioned steps. Step 1: Press the Windows key on your keyboard, type Device Manager, and click Open. Tip: Alternatively, you can open the Run command box using the keyboard shortcut ‘Windows key + R,’ type devmgmt.msc in the text box, and press Enter.
Step 2: In the Device Manager window, select and double-click on Keyboards.
You will be shown a list of all keyboards currently connected to your laptop including the built-in one. Step 3: Navigate to the built-in keyboard, right-click, and select Update driver from the context menu.
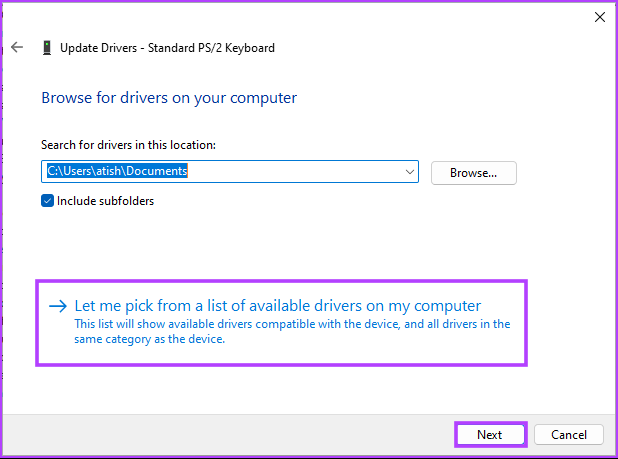
Step 4: You will see the Update Drivers window, in which you will be asked, ‘How do you want to search for drivers?’ Select ‘Browse my computer for drivers.’
Step 5: On the next screen, you will be asked to browse the file location. Click on ‘Let me pick from a list of available drivers on my computer.’
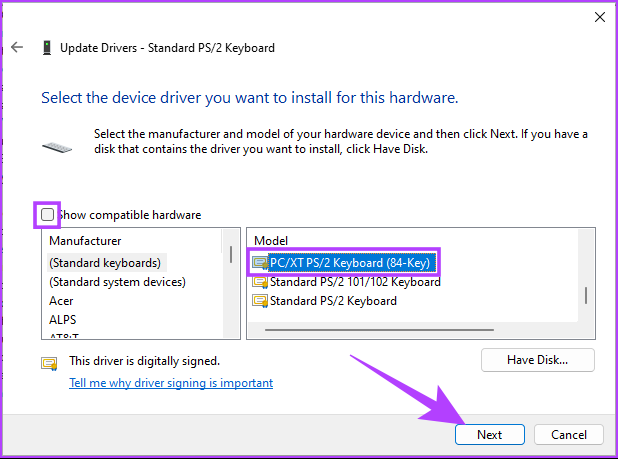
Step 6: Now, uncheck the ‘Show compatible hardware’ option, select the manufacturer different from your standard keyboard, and click Next.
You will get a warning that the driver you are about to install may be incompatible with the device. Click on Yes to confirm.
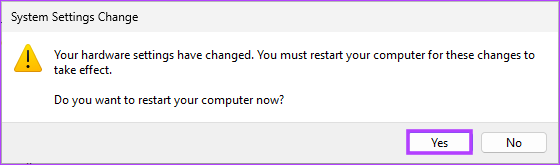
Step 7: Finally, when asked ‘Do you want to restart your computer now?,’ click Yes.
Once the laptop returns from the reboot, your keyboard won’t work. If you want to revert, all you need to do is follow the above steps 1-4, and instead of choosing ‘Browse my computer for drivers,’ choose ‘Search automatically for drivers.’
How to Permanently Disable Laptop Keyboard
There are a couple of ways in which you can permanently disable your laptop keyboard. We have listed the prominent ways below. So, let’s jump into it.
1. Turn off the Keyboard Using the Command Prompt on Windows
Using Command Prompt to disable the built-in laptop keyboard is straightforward. Follow the below steps. Step 1: Press the Windows key on your keyboard, type Device Manager, and click Open. Tip: Alternatively, you can open the Run command box using the keyboard shortcut Windows key + R, type devmgmt.msc in the text box, and press Enter.
Step 2: In the Device Manager window, select and double-click on Keyboards.
You will see a list of all keyboards currently connected to your laptop including the built-in one. Step 3: Navigate to the built-in keyboard, right-click, and select Uninstall device from the context menu. Note: Some laptops may not have the Uninstall device option; instead, you will find the Disable device option. However, the outcome will be the same.
Step 4: In the prompt asking you to confirm the decision, click Uninstall and close all tabs.
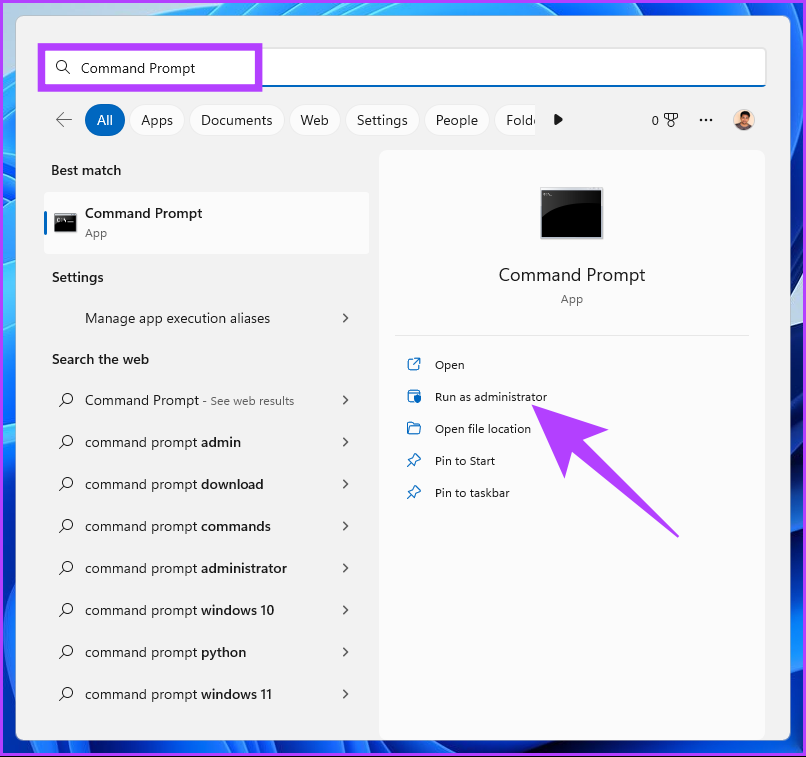
Step 5: Now, press the Windows key on your keyboard, type Command Prompt, and click on ‘Run as administrator.’
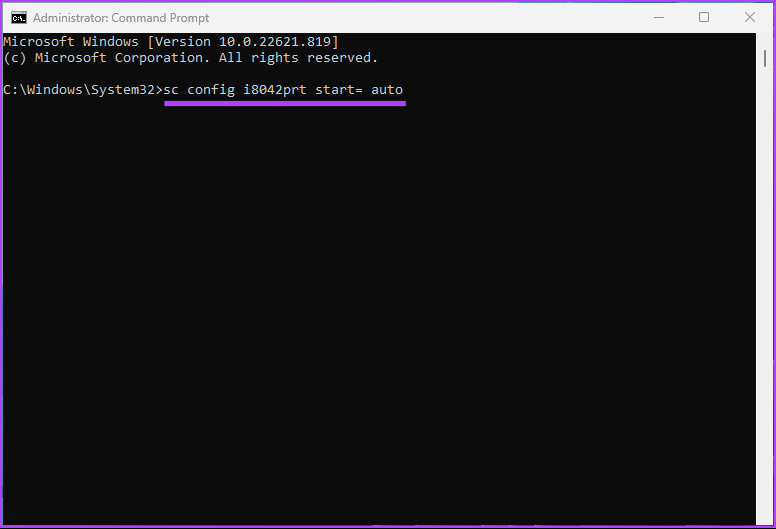
In the prompt, click on Yes. Step 6: In the Command Prompt, type the below command and hit Enter.
This command stops Windows from re-enabling the keyboard when you restart the computer, making it a permanent solution. Step 7: Finally, restart your laptop. That’s it. You have successfully disabled your laptop’s built-in keyboard. Now, if you want to use the keyboard again, you will need to type the following command and restart your computer.
If you don’t want to disable the keyboard using Command Prompt, you can use Group Policy Editor to do the same. However, you must be running on the Windows Pro or Enterprise versions. The Home Edition will not have the Policy Editor. That said, jump to the next method to find out how.
2. Deactivate the Keyboard Using the Group Policy Editor on Windows
Step 1: Press the Windows keys on your keyboard, type gpedit, and click Open.
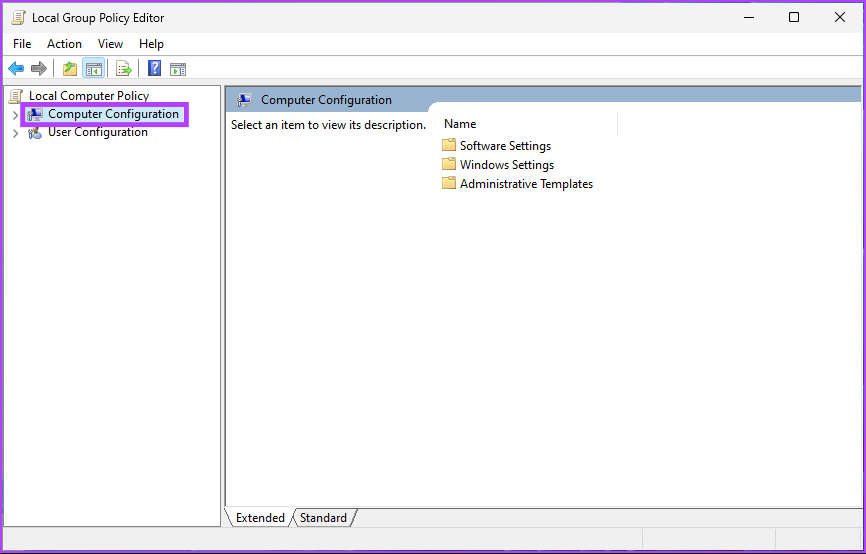
Step 2: In the left pane, under Local Computer Policy, select Computer Configuration.
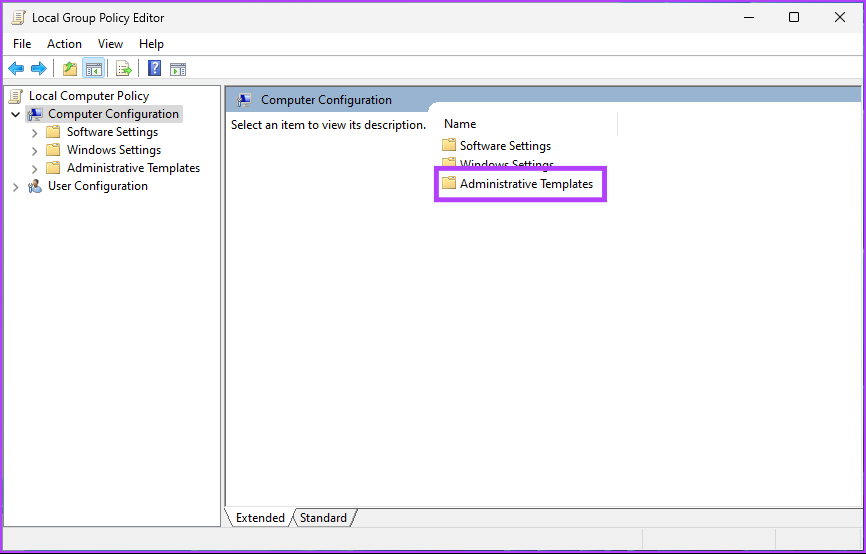
Step 3: In the right pane, double-click on Administrative Templates.
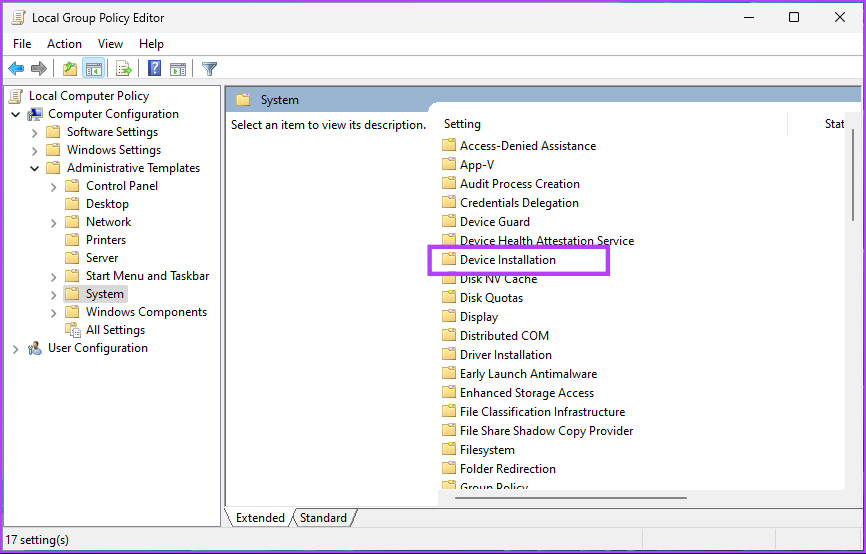
Step 4: Select the System option.
Step 5: Under the System option, locate Device Installation and double-click on it.
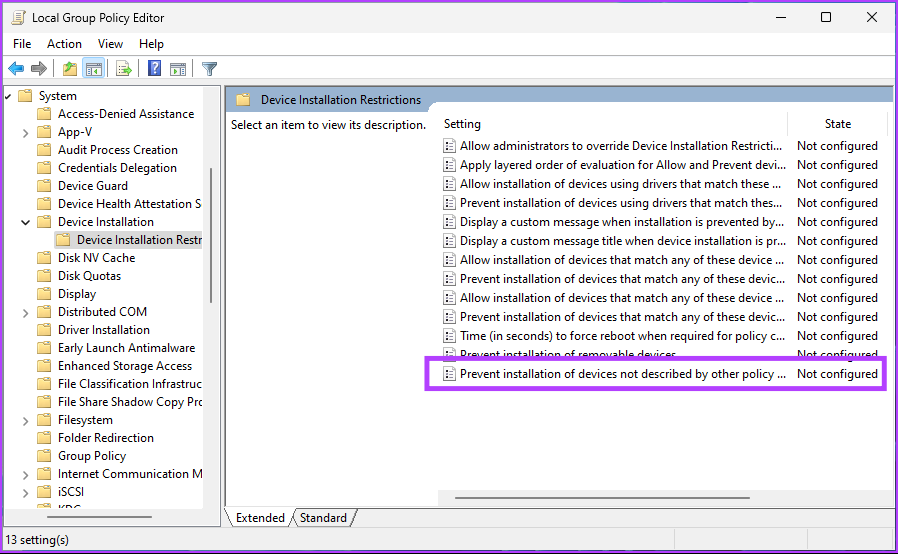
Step 6: Go to ‘Device Installation Restrictions.’
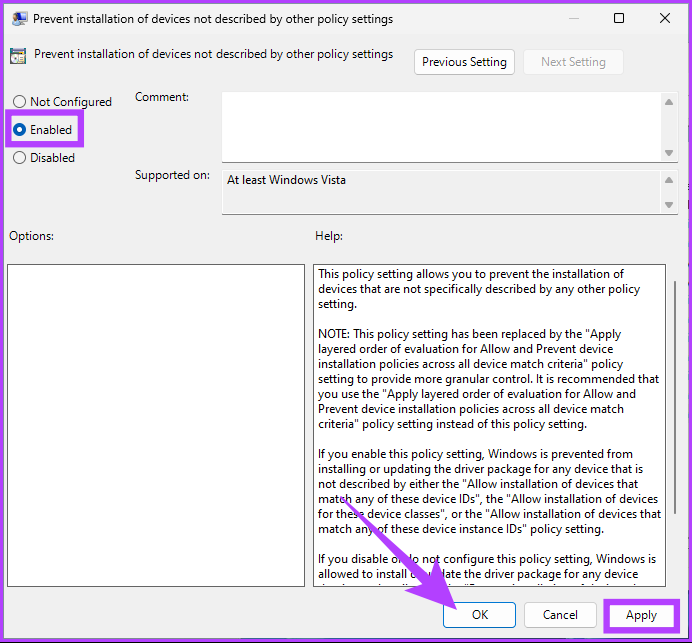
Step 7: Double-click the ‘Prevent installation of devices not described by other policy settings’ option and choose Edit.
Step 8: In the ‘Prevent installation of devices not described by other policy settings’ window, select the Enabled option, click Apply, and then OK.
Now, close all the tabs. Step 9: Press the Windows key on your keyboard, type Device Manager, and click Open. Tip: Alternatively, you can open the Run command box using the keyboard shortcut ‘Windows key + R,’ type ‘devmgmt.msc’ in the text box, and press Enter.
Step 10: In the Device Manager window, select and double-click on Keyboards.
A list of keyboards will be shown to you that your laptop is currently connected to including the built-in one. Step 11: Navigate to the built-in keyboard, right-click, and select Uninstall device from the context menu. Note: Some laptops may not have the Uninstall device option; instead, you will find the Disable device option. Click on it.
Step 12: In the prompt asking you to confirm the decision, click Uninstall.
This way, you have permanently disabled your laptop’s built-in keyboard. If you ever want to enable your keyboard in the future. All you need to do is follow Step 1 to Step 7, and in Step 8, under ‘Prevent installation of devices not described by other policy settings,’ select the Enabled option and click Apply followed by OK.
Get Rid of Your Laptop’s Keyboard
Now that you know how to disable your built-in laptop keyboard, you can avoid those accidental key presses. Moreover, we have provided you with temporary and permanent disablement options; choose wisely. Also, don’t forget to enable the keyboard again if you are planning to ditch the external keyboard.