You might be wondering what a faulty date and time can do to your computer. Whether it is the inconsistent timestamps on your file transfers, incorrect daylight savings time, or the most common internet connection issues, they all stem from the wrong date and time on your computer. Now that you know the side effects of the incorrect date and time, let’s show you how to fix it.
How to Change Date and Time in Windows
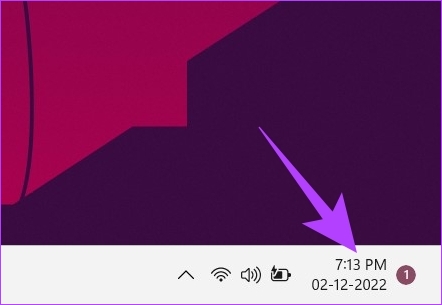
The steps to change the date and time in Windows are simple. Follow the steps below. Step 1: On the Desktop, right-click on the ‘Date and time’ widget in the bottom right corner.
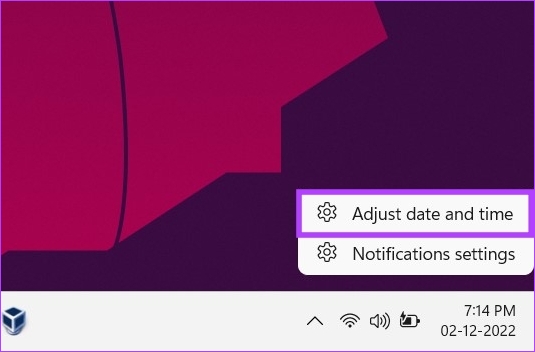
Step 2: From the context menu, select ‘Adjust date and time.’
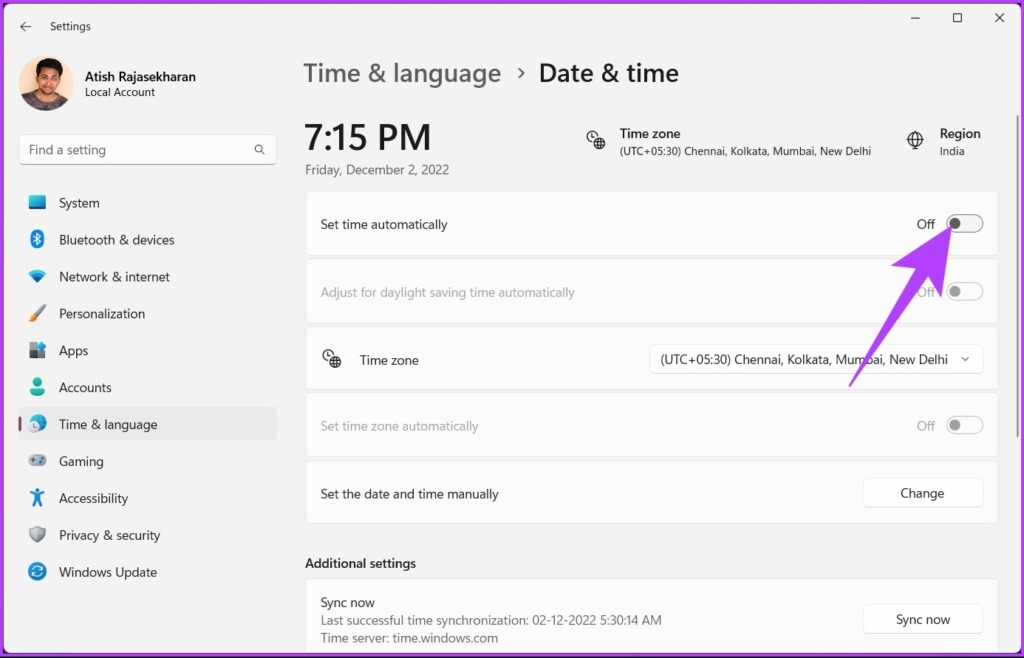
You will be taken to the ‘Date & time’ settings window. Step 3: Toggle off the ‘Set time automatically’ option. Note: If the option is already toggled off, move to the next method.
Step 4: Click the Change button next to ‘Set the date and time manually.’
Step 5: Now, change the date and time as per your preference. Finally, press the Change button.
And that’s about it. The date and time change on your PC as needed. Well, if you don’t want to do it through the Settings app, you can do it the traditional way. Keep reading.
How to Change Date and Time on Windows With Old UI
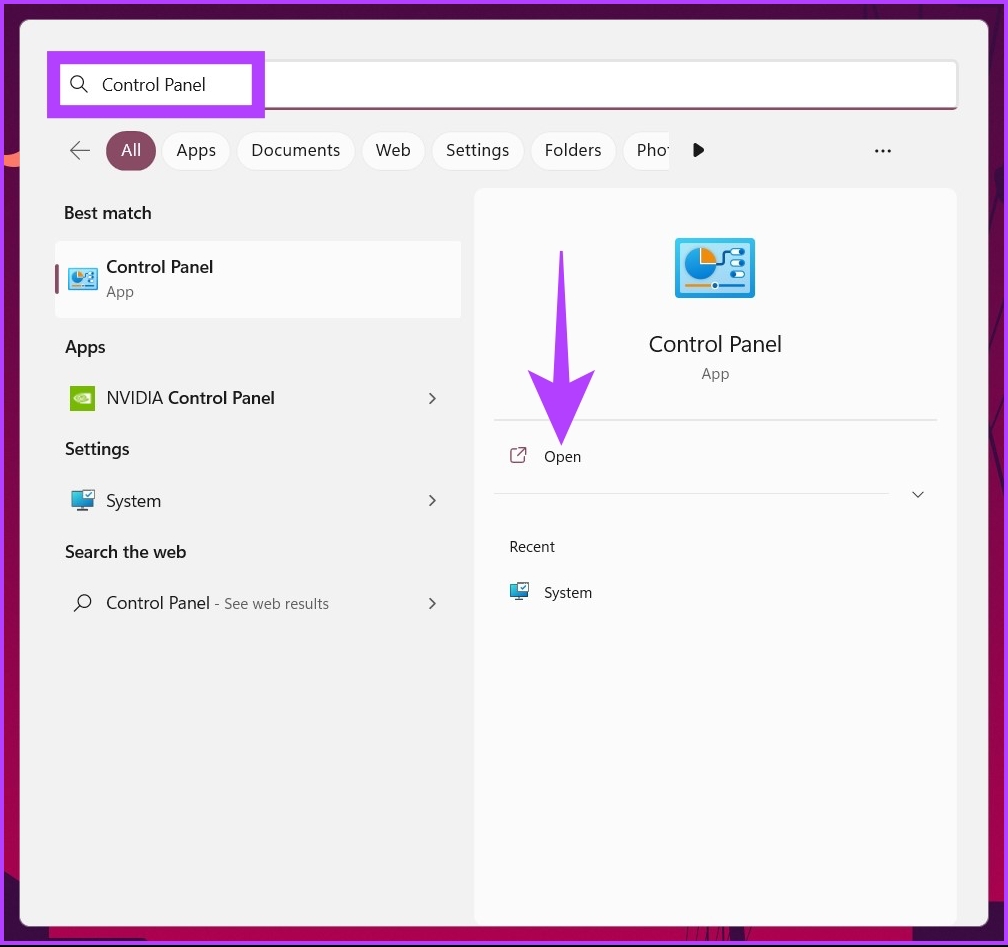
Changing the date and time in Windows 11 and 10 with the old UI is slightly different. However, it is simple to follow. Step 1: Press the Windows key on your keyboard, type Control Panel, and click Open.
Step 2: Go to ‘Clock and Region.’
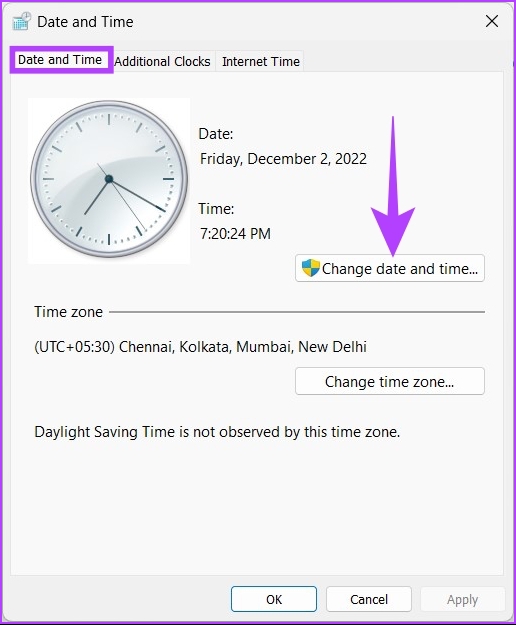
Step 3: Under the ‘Clock and Region’ window, select ‘Date and time.’
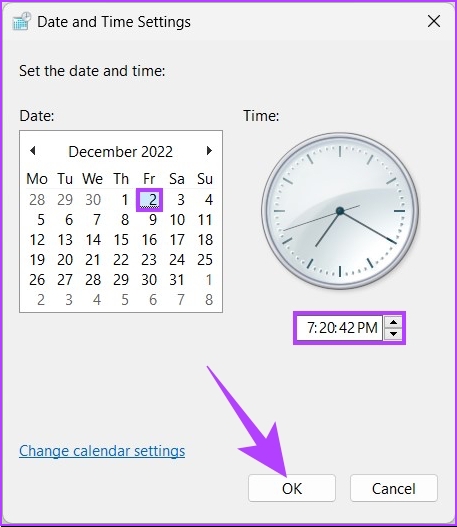
Step 4: Click the ‘Change date and time’ button. You will be presented with an option to change the date and time in the old-fashioned Windows way. Step 5: After setting the date and time, click OK to apply the changes. There you go. You have successfully changed the date and time using the old-fashioned way. This method is still prevalent even after the release of Windows 11. If you are not looking to change the date and time but rather the format, continue reading.
How to Change Time and Date Formatting on Windows
There are two ways in which you can change the formatting of the time and date on your Windows devices. We have illustrated both in the following sections.
1. Change Date and Time Formatting Using the Taskbar
Step 1: On the Desktop, right-click on the Date and Time widget at the bottom right corner.
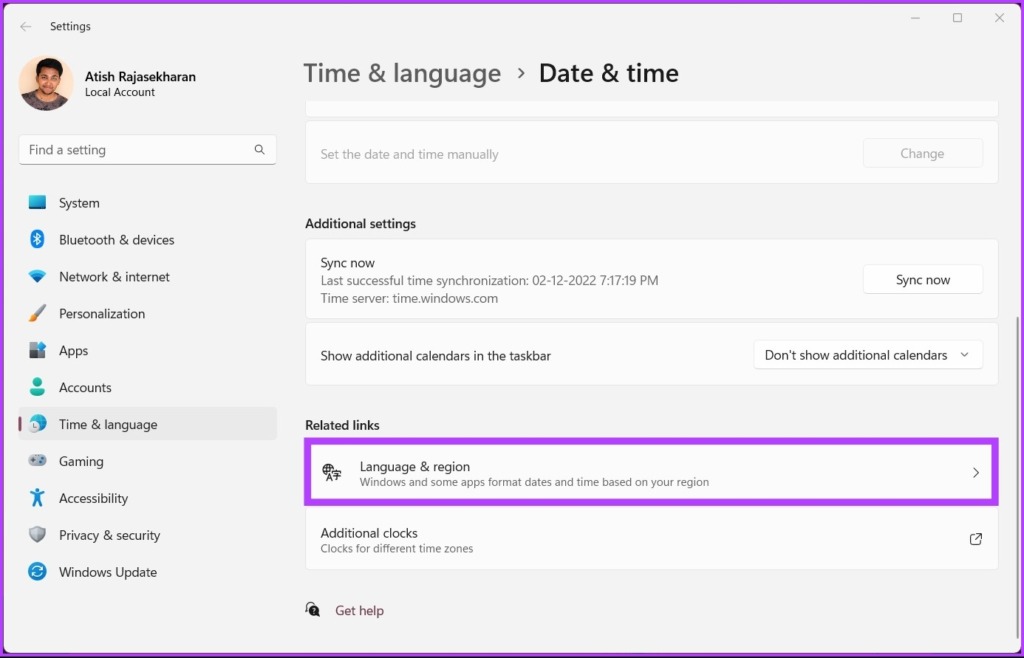
Step 2: Click on the ‘Adjust date and time’ from the context menu. Step 3: Under the ‘Date & time’ Settings page, scroll down and click ‘Language and region’ under Related links.
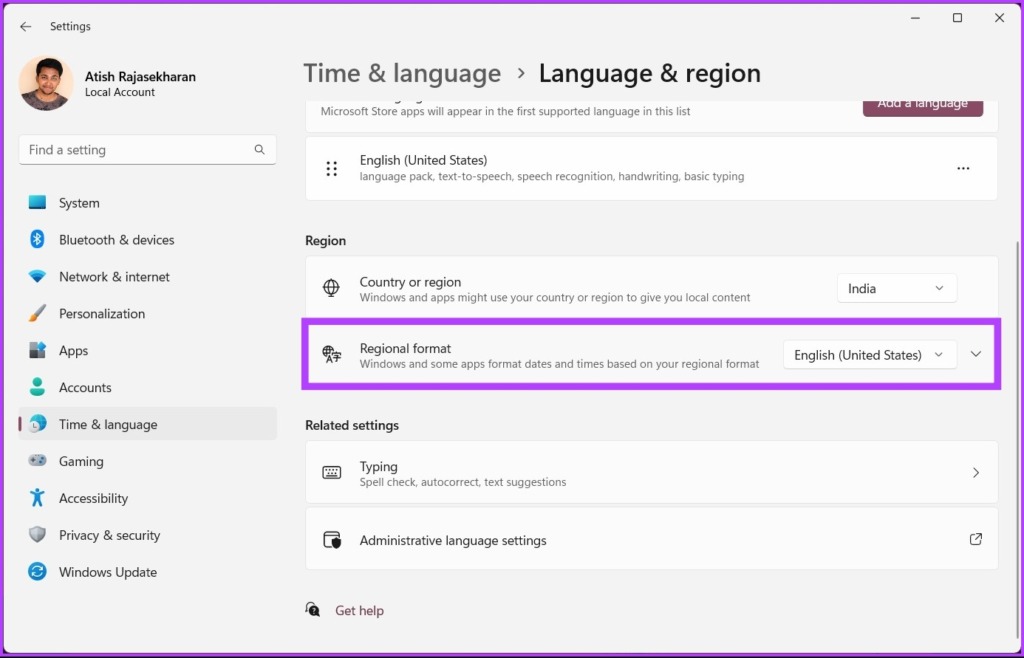
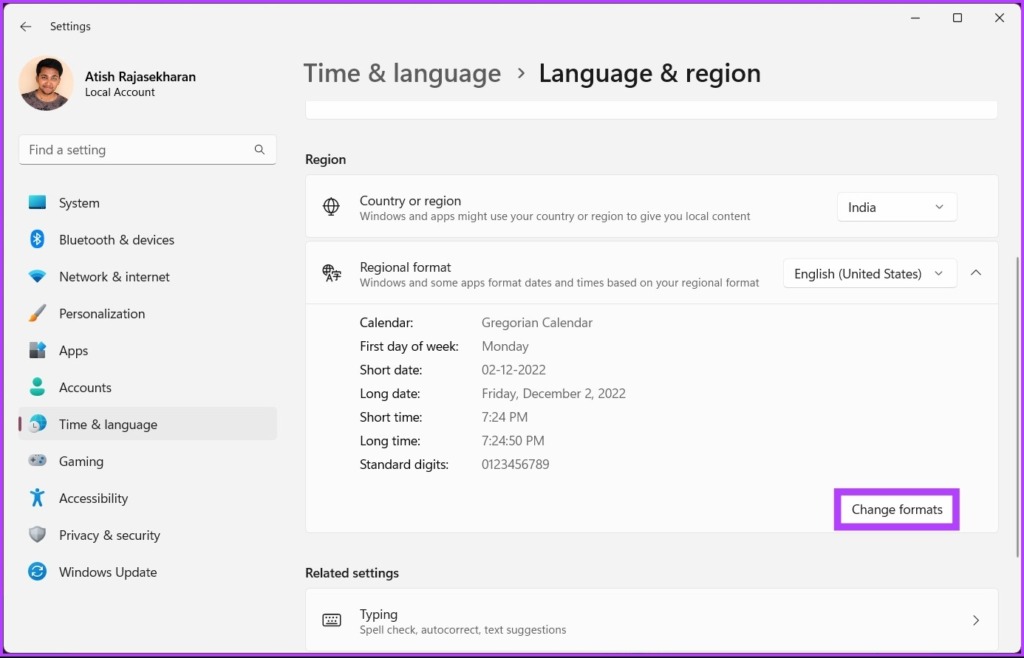
Step 4: Under Region, click Regional format.
Step 5: From the drop-down, select Change formats.
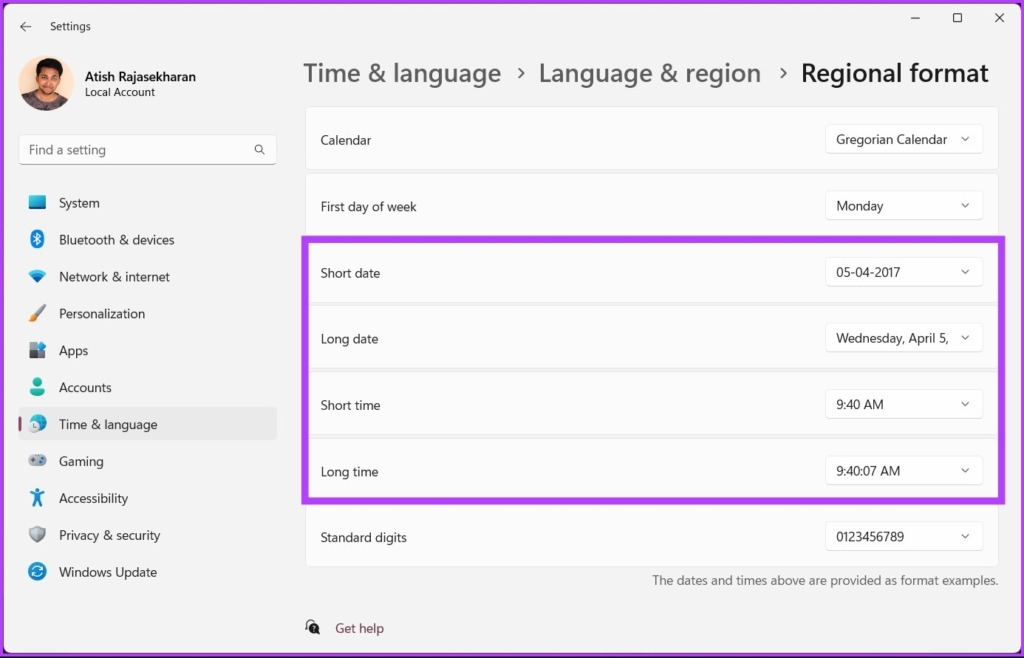
Step 6: Now, you can change the calendar, day, date, and time formats as per your preference.
That’s about it. You now know how to change Windows’s Date and time format. Well, if you don’t want to do it through the Settings app, you can do it the traditional way. Keep reading.
2. Change Time and Date Formatting on Windows With Old UI
The steps are similar; however, executing them is slightly different. Follow the steps below. Step 1: Press the Windows key on your keyboard, type Control Panel, and click Open.
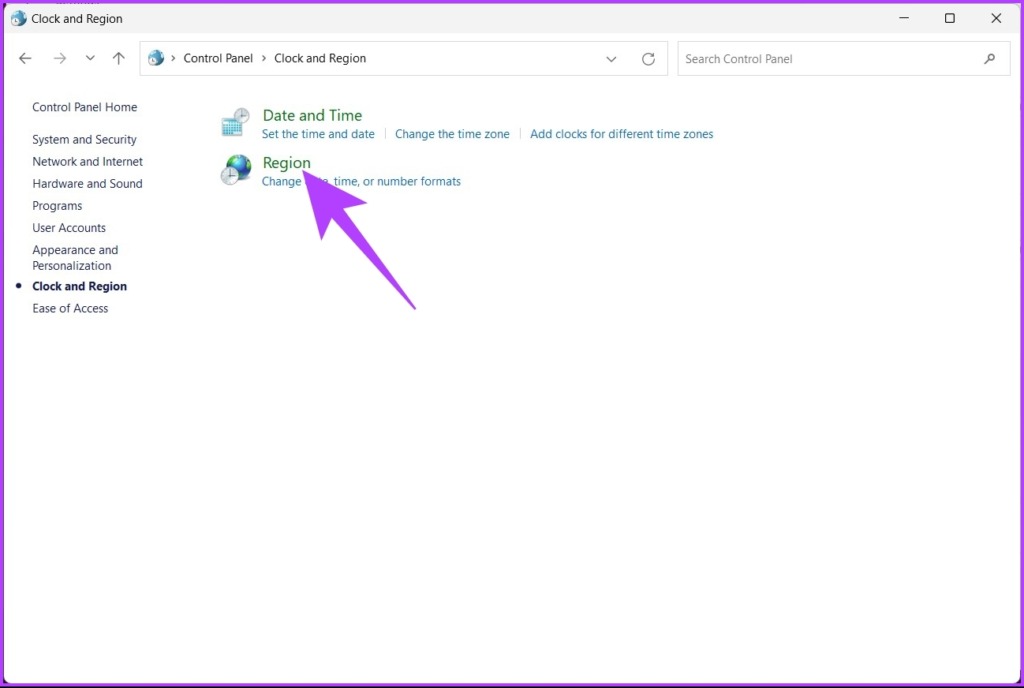
Step 2: Go to ‘Clock and Region.’
Step 3: Under the ‘Clock and Region’ window, click Region.
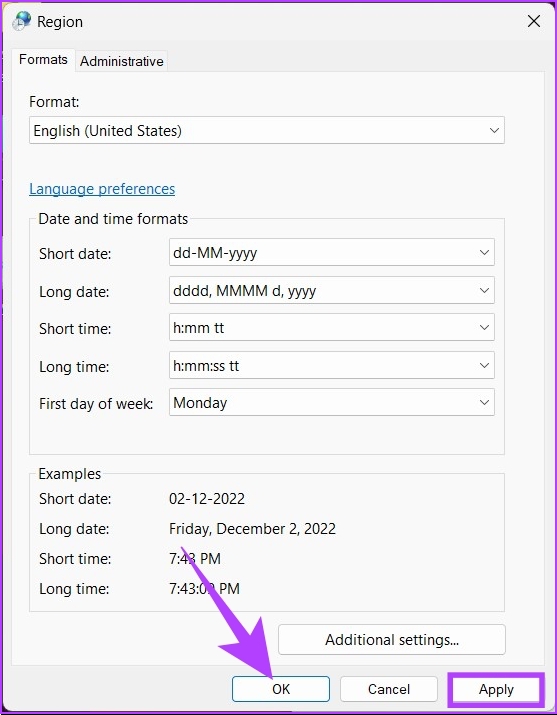
Step 4: Now, in the Region window, change the ‘Date and time formats’ under Language preferences in the Formats tab.
Step 5: Finally, click Apply and then OK. This is how you can change the date and time format using the old Control Panel way. However, if you don’t want to go through the hassle and want to switch to automatic, continue reading.
How to Set Date and Time Automatically on Windows
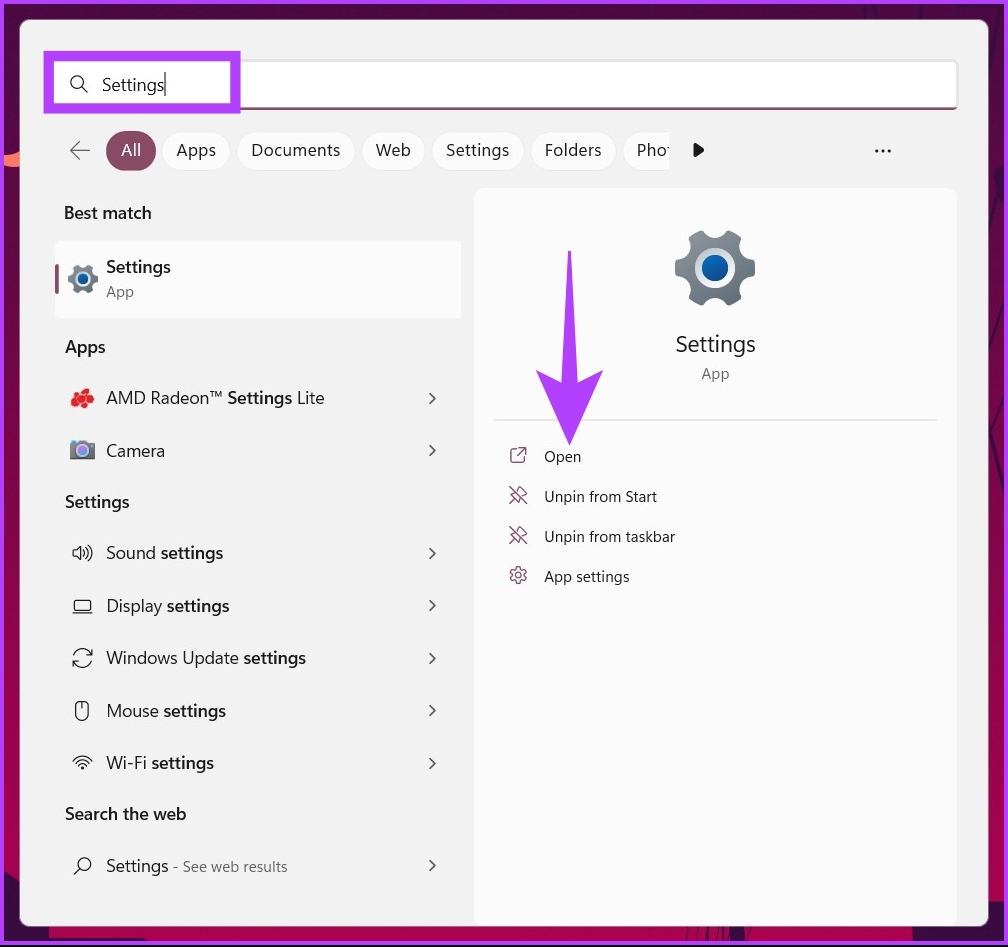
If you don’t want to manually change anything and want the operating system to set everything up for you, or if you want to roll back all the manual changes you made and automatically set your date and time, follow the below instructions. Step 1: Press the Windows key on your keyboard, type Settings, and click Open.
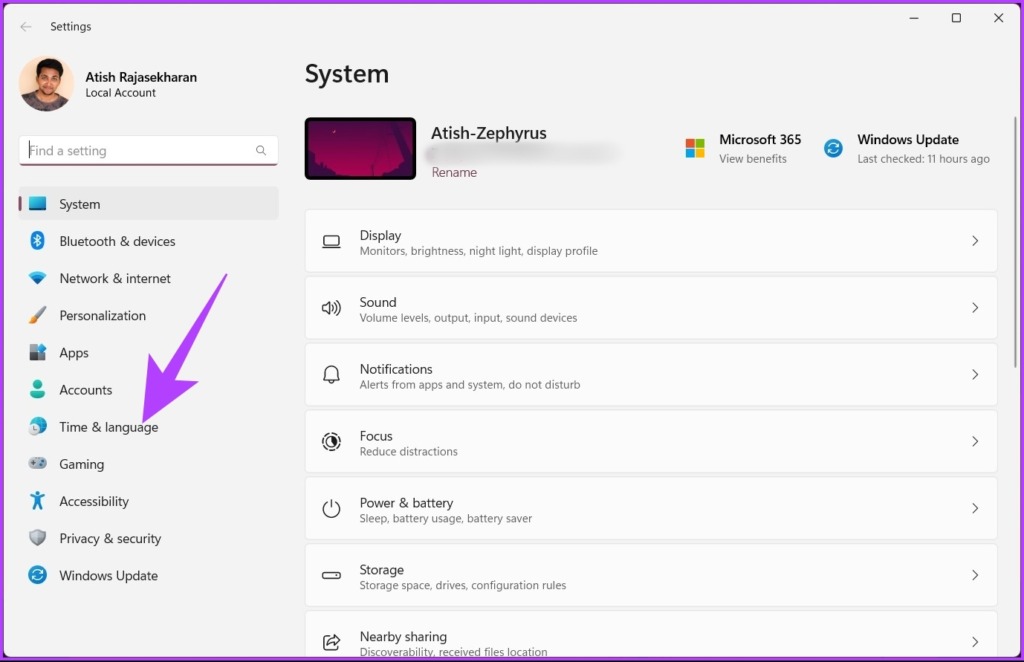
Step 2: Go to ‘Time & language.’
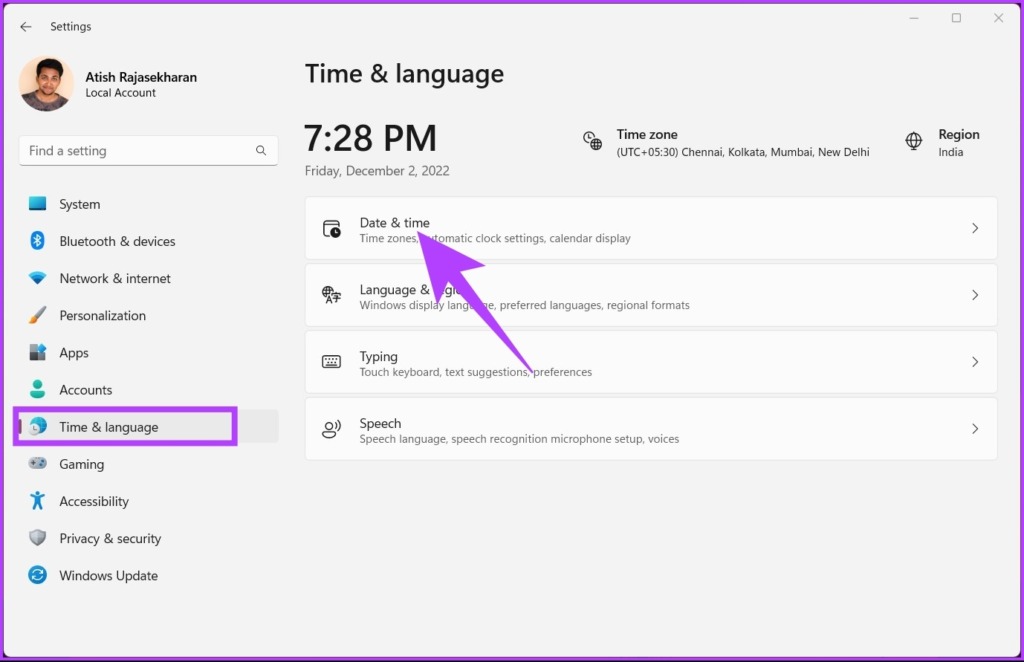
Step 3: Now, select ‘Date & time.’
Step 4: Under ‘Date & time,’ click on Time zone.
Step 5: From the drop-down, select your Time zone.
That’s it. Your Time zone gets changed, and all the manual settings you made earlier will get replaced and updated with the time zone you select. However, if you want to avoid setting a Time zone but instead want to fix it quickly, check out the next method.
How to Synchronize Windows Time and Date to an Internet Time Server
This method is handy when your Windows system time and time zone need to be corrected. You can avoid going through changing the time zone, and instead, set up the time using the Internet Time Server quickly. Follow the below-mentioned steps. Step 1: Press the Windows key on your keyboard, type Control Panel, and click Open.
Step 2: Go to ‘Clock and Region.’
Step 3: Select ‘Date and time.’
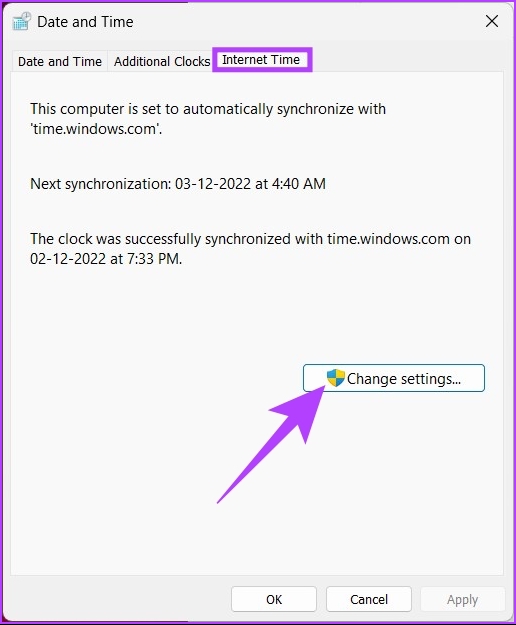
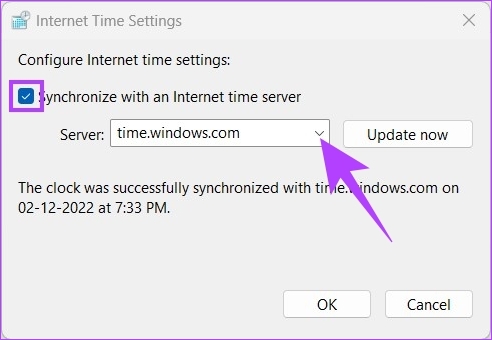
Step 4: Go to the Internet Time tab and click the Change settings button. Step 5: In the ‘Internet Time Settings’ window, check the box ‘Synchronize with an Internet time server.’ Additionally, click the Update now button. Note: You can change the server to ‘in.pool.ntp.org‘ if you are in India or time.nist.gov, the time server of the US National Institute of Standards and Technology. Step 6: Finally, click OK.
And there you are at the right time. Pretty simple right? If you want to set a clock with a different time zone, jump to the following section.
Bonus: Set a New Clock for Different Time Zones on Windows 11/10
Apart from setting the time and time zones and choosing a server, Windows also lets you add clocks for different time zones. If you are someone who wants to follow another time zone, follow the below-mentioned steps instead of changing the date and time on your PC over and again. Step 1: Press the Windows key on your keyboard, type Settings, and click Open.
Step 2: Click on ‘Time and language’ and select ‘Date & time.’
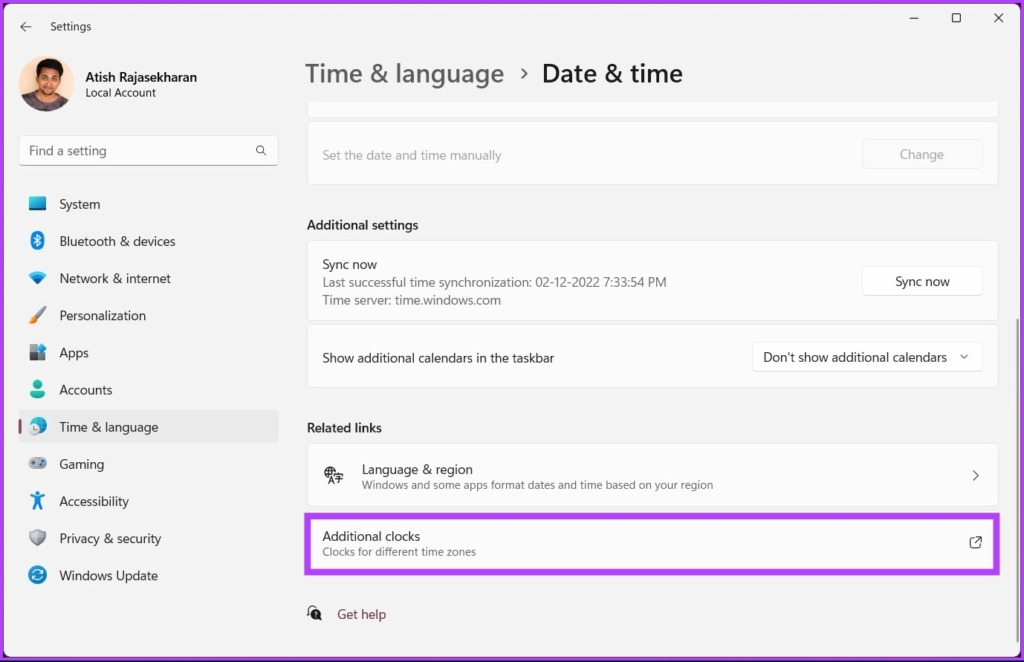
Step 3: In the ‘Date & time’ screen, click Additional clocks or ‘Add clocks for different time zones’ under Related settings.
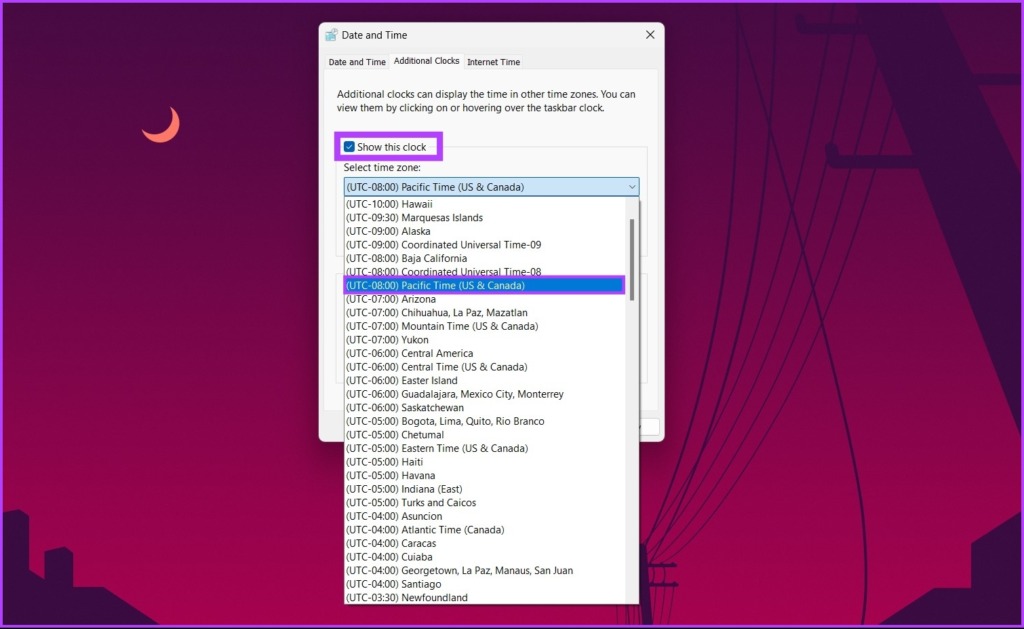
Step 4: Now, click ‘Show this clock’ and select the time zone for the new clock from the drop-down menu.
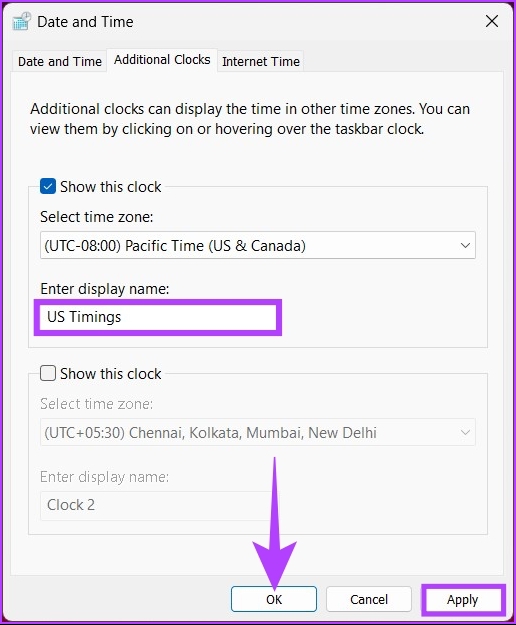
Step 5: Once selected, you can rename the Clock. Finally, click Apply and then OK to apply the changes.
That’s it. Once you go back to your desktop and click on the date and time widget, you can see the other time zone up top.
Align With Your Timezone
So, from now on, whenever you are stuck with the wrong timing on your PC, you know how to change the date and time on Windows without having to worry about the steps and methods. We hope this article helps you. The above article may contain affiliate links which help support Guiding Tech. However, it does not affect our editorial integrity. The content remains unbiased and authentic.